'At Home With Heather': How to Turn Trash to Treasure for the Perfect Thanksgiving Table
Read Transcript
- Hey friends!
Welcome to my house.
Here we inspire, create,and just be ourselves.
I don't know if you'vebeen out shopping lately,
but the holiday buzz is in the air.
The sounds of the season are happening.
The smells of pumpkin spice lattes.
And turkeys are on sale everywhere.
Yup!
Thanksgiving is approaching quickly.
And maybe you are part ofthat stress mode right now.
Well, today, we wannahelp take your stress mode
to prep mode with some amazing, fun,
time and money saving inspirations
that will wow your Thanksgiving table.
So let's look at a couple ideas
that will help zhoozh up thisyear's Thanksgiving table.
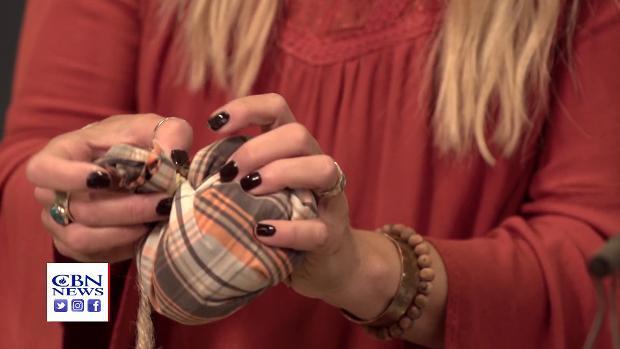
We're gonna start out with a napkin.
Sure, you can lay your napkin out
and put the silver on it,
but why, that's kinda boring,
so let's take it up a little notch
with this simple DIY that anybody can do,
even your kids.
And I know that you have found these
in your bathroom before.
An empty roll of TP
and instead of tossingthem, we're gonna DIY them
and it's this simple.
You just cut your DIY oryour toilet paper holder
in half like this, so easy, voila,
and you're gonna find some burlap,
which I have laying around all the time,
but you can get a quarter of a yard
at your local fabric storefor just a dollar or two
and then we're justgonna match it on there.
It's this simple.
You don't even have to measure.
You can just eyeball it.
Take your glue gun, whichevery house needs a glue gun,
and you're gonna glue it right on there,
and it's really good whenyou're working with a glue gun
is to use a low temp.
It saves your fingers in the long run
if you want to invest in one.
We're gonna simply put iton there, roll it around,
and voila, you see thattook simply a few seconds
and you can take your napkins like so,
pull it through, and it's a great way
to display a super cute holidaynapkin for just pennies.
Isn't that adorable?
So now we're gonna scoot over here
and nothing makes your guestsfeel more special and wanted
than a personalized place setting holder.
And these are so easy, they are free.
Just take a walk outside,grab some pine cones,
find some card stock or paper
that you have laying around in your house,
write their name, lay it on here,
and voila, put it infront of the table setting
and you have a simple DIY
that makes your guestsfeel like they are wanted
because their name is on the table.
And now, I have saved the best for last.
And when you see this,
you're gonna be making these for everyone.
These are a DIY pumpkin
that you can use as a centerpiece
for your Thanksgiving holiday season
and this will totally wow your guests
and I'm gonna show you how to make it.
And it costs barely anything.
The first step that you have to do
is go shopping in your closet.
Look around.
My husband, I haven't seen himwear this shirt for a while
so I just went ahead andstarted to do the DIY with it.
So you're gonna use thesleeve of an old shirt
or a sweater or whateveryou have laying around
and we're going to simply lay it out flat.
It doesn't have to be measured perfectly.
You just eyeball it like that.
Gonna get rid of that part.
And you can make it as big or as small
as you are feeling.
So this one's about this size
so I'll keep that here for you.
Look out.
We're gonna take our shirt over here.
So now, you have your shirt sleeve
and the next thing thatyou're going to need
are some rubber bands, okay.
So just go into the junk drawer.
We all have them in there.
And we don't even knowwhy we keep rubber bands
in the junk drawer, but this is why,
because for this DIY.
So you're gonna take your shirt sleeve
and turn it inside out like so.
So it's inside out
and you're gonna find theend, gather it at the bottom,
and then take your rubberband and twist it around
the bottom and you aremaking an end like that.
So easy, right?
So then we're gonna turnit right side right again
and now you have alittle pocket like that.
So are you feeling thepumpkin coming to life here?
So here we are.
And now, you need some polyfill,
and actually, I was out of polyfill,
so you know those old pillows
that you have layingaround that you just keep
and you don't even knowwhy you have those pillows?
I cut it open and bam, therewas my polyfill right here.
And we're gonna take some polyfill
and you are gonna stuff this guy like this
and just move it aroundinside to give it some form
and we're gonna make him a little full
but he is so cute.
And we're going to justdo the same thing now
at the very top, like we did on the inside
and you see, we'recreating a little pumpkin,
little brother for our little friend
and we're going to rubber band this part
and while we're rubber banding this,
I'm gonna tell you about oneother thing that you need
and that is some jute or twine.
And they have that atyour local Dollar Tree,
but I actually just wentinto my garage and found some
in my husband's little workbench.
So I'm gonna take my jute
and find the end and youare going to just simply
keep your glue gun plugged in
and you are going to glue the part
on the top of the pumpkin
and you see how fast this is
and you see how it'sbecoming a little pumpkin.
So we're starting the glue there
and we are going to twist this baby around
and this is going tocreate your pumpkin stem.
And I'm gonna do it pretty tight
so you can see how we're rolling it here
and this guy is taking form
and he is so adorable.
Okay, so now we're at the end, as you see,
and I'm going to take my glue gun,
but before I do that,
there's just a little kinda,
just a little patch on the end there.
I'm just gonna trimthat right off like that
and then I'm gonna cut my twine.
So you see I didn't use hardly any twine
and I am going to glue the top
to keep the end in spot
and because it's a low temp glue gun,
I can hold it there andit doesn't even hurt.
So there we go.
Oh my gosh!
Look how cute this is!
And so, now we're gonna garnish it
and you can garnish itwith whatever you want.
I found a cute thing of eucalyptus.
I love eucalyptus,
but on this one, we'regonna do a little fall leaf
and I'm gonna glue itright on there like so,
so here we go.
We're just gonna put a littledab of glue on our leaf
and put it on the stem of our pumpkin
and hold it there for a second
and then you have the most amazing
little pumpkin centerpiecethat your guests
have never seen beforebecause it is a one of a kind,
because it's dedicated from your husband
because it's his shirt.
So he'll never know it's even shirt.
So if we just line themup together in a row
for our Thanksgiving centerpiece,
it will totally wow your guests
and it's so easy, so fun.
The kids can do it, you can do it,
and it's just about free.
So I wanna take you to myfavorite room of my house
and that is the dining room
where we will be setting up Thanksgiving.
Let's go.
Remember when dressing atable for any occasion,
think of it like the little black dress.
You start out super basic
and then you add your accessories
to zhuzh it up either way.
Whether you wanna goglamorous or laid back
and that's exactly how we'regonna look at our table.
We're starting out our Thanksgiving table
with a $1 roll of brown packing paper.
It's just $1, you unroll it,
and now it will be your table cloth.
It makes a super easy setup
and there's a couple other fun ideas
that we're gonna talk aboutthat you can do with it.
Next, we're gonna lookat your table runner.
And sure, you can put atable runner on there,
but why not think out of the box?
Here, I am using an oldpiece of barn siding.
It's super cute.
It goes with the farmhouse vibe these days
and if you can't finda piece of barn siding,
just go to The Home Store.
They'll cut a piece of wood for you.
Just give them an extra smile
and they might even sand it down.
And if you don't evenhave time to do that,
take a walk out to your garage.
You might find a piece of wood out there
that was from one ofthose unfinished projects
that the hubs was going on
and I promise you it will not be harmed
in this table setting.
Next, you want to find your centerpieces
and this is where our super adorable
DIY pumpkins comes into place.
I make 'em with shirts and sweaters
and I just lined themup, all on top of our
piece of barn siding.
Added a little bit of flowers and leaves
and voila, I think this is so festive,
so one of a kind and so unique.
I absolutely love it.
Now, we're going to look at
a way to make your guest feel very special
and like they are wanted at this table,
and that is a personalized table setting.
Now, this is where I did spend some money.
$3, to be exact.
I really splurged.
I have a $1 charger, a $1 plate
and then I really splurgedwith some really cute leaf cups
that just add that extra little touch.
And we're gonna garnish these plates
with our really cut burlap napkin rings
that we made earlier.
Put a little leaf in there,
and it's really fun and festive.
And another way to makeyour guests feel important
are our DIY pine cones
as you can see right here.
We just take our pine cone,
lay it down in front of the plate
and everyone knows where they sit
and that they are wanted and special.
Now, if you didn't have time to go out
and find your pine cones,
this is another easy idea
to take advantage of your brown paper.
Just get the old Sharpie
and right where everyone is sitting,
just go ahead and write their name
right on the brown paper
and it just is a reallycute addition to the table
and they know right where to sit
and I just love how that looks.
It really stands out.
And another idea to rememberwith your brown paper
is grab a little container of crayons
and just set it on thetable for all your littles
that get antsy towards the end of dinner
when the parents still wanna hang out
and talk a little bit.
So these are all reallyamazing, wonderful ideas
and so remember, once the table is set
and the dinner is prepared
and all your guests have gathered around,
there is one more thing
to make your Thanksgiving table amazing
and that is giving thanks.
So you take the lead.
Say what you are thankful for this year
and then give opportunity
for others to share whatthey're thankful for.
So I am so thankfulthat you joined me today
and I am counting myblessings this Thanksgiving
and for more on Home with Heather,
check out cbnnews.com,
and remember, a home is a place
where you can express yourself.
So you be you and I'll be me
and I'll see you nexttime at Home with Heather.